


Civil War Era Transfer Dock
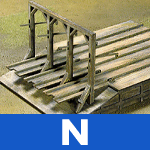 Here’s our new kit build from the Micro-Trains Line of US Civil War era laser kits, the Civil War Transfer Dock (MTL #499 90 961). Like the ventilated shed kit we built last time, I like this transfer dock because it’s not a structure you see every day on a layout. This kit absolutely does evoke an historic feel at a glance.
This being the second N scale Civil War kit I’ve built, I’ve been poking around online to see what other model railroaders are doing with this era and came across a site I’d recommend: US Military Railroads, this is a good one to bookmark and look through on a coffee or a kit building break!
Much like the ventilated shed, this is a straight-ahead kit to assemble. Also as on the shed kit, I held off on color until I had some of the structural pieces assembled to minimize the possibility of warping. After looking at lots of temporary structures from this period, I found that many of them are simply unfinished, weathered wood. I was tempted to simulate a limewash on this kit, as I did on the ventilated shed, but trying to keep in the spirit of the temporary nature of this dock at the time it was built, I’ve chosen to go with the more natural, weathered wood. I did have an accidental gray primer spill on the top deck, but we’ll get to that in a minute.


Starting at the beginning, the cross-bracing dock pieces are assembled with tab-and-slot design. Even on something this simple, I still like to square everything up while gluing. I used an old machinist’s square to make sure my angles were at 90 degrees. I also use a couple of calibration weights from now-defunct digital scales to hold the wood in place while the glue dries. Not the fanciest jig system out there, but it works well.
Once the dock structure was assembled I added the side pieces that represent the dock’s structural support beams, at this point I gave the dock sides a coat of stain. I went with a weathering powder and alcohol mix for this, as I would on the rest of the kit. It’s a quick and easy way to make your own stain for pennies.
Next was the top deck where the rails are attached. I could have used a few drops of CA but anytime I attach rails to wood I like to use Pliobond, the old and very reliable contact cement. I also like to rough up the bottoms of the rails, just a bit, to help give the Pliobond a rough surface to grip.


On trick I’ve learned when using Pliobond is to use a soldering iron on the rail tops to fast-cure the glue. Not only does this speed the curing process but also it does a great job of strengthening the bond. Keep the tip of the iron on the rail top until you can see the Piloibond begin to bubble just a bit from the rail sides. I then move the iron to the next section of rail and place the machinist’s square on the rail top I just heated until the glue cools. A very quick and effective way to make sure your rail is flat and solidly attached.
With the rails attached to the top of the deck, I thought it would be a good time to accidentally spill a bit of gray primer on the deck. It could have been worse; it could have been bright red paint! I quickly grabbed a paper towel and wiped off the gray primer puddle. It had the beginnings of a weathered wood look to it so I wiped the gray primer to a few other areas on the deck. Can’t cry over spilled primer, besides I figured the top coat of my weathering powder and alcohol wash would help the whole thing blend. Just how I planned it!
Once the top deck and ramp were glued in place, it was just a matter of sliding the gallows section through the holes in the ramp and attaching the 4 wooden arms with the simulated block and tackle rigging.
This is a very cool little kit with lots of character, and when we build the companion MTL car float kit to go alongside this dock, it would definitely be a great focal point on a layout.
Category: Raildig Build Projects


