


Civil War Era Car Float
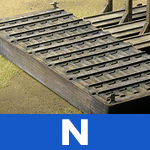 In this article, we’ll build the Micro-Trains Line N scale Civil War Car Float (MTL #499 90 960), this car float is the companion piece to the Micro-Trains N scale Transfer Dock (MTL #499 90 961) we built in a previous article. A car float is an unpowered barge with rails on its deck, used for moving cars on and across bodies of water such as rivers. To get the cars on to the float, it would have to mate up closely with a transfer dock, as this model does.
This kit is a very simple build; you can easily spend more time working on the color through paints, stains or weathering powders than you will assembling the kit itself. As with all kits, making sure the kit is square is the most important step in the entire process. You can always work and rework your color and weathering but you only get once chance at the beginning to make your kit square and true.
Here I’ve used my trusty (and slightly rusty) machinist square to make sure the car float sides are perpendicular to the top deck. A touch of CA to tack the sides in place and then a coat of yellow wood glue on the inside joints does the trick for me. The center keel in this kit has five cleats cut right in to it, cut these cleats out before attaching the center keel to the underside of the deck. Once the two laser scribed sides and center keel are glued in place, the two end plates go in next to finish the basic structure of our car float. That was quick!


In the directions for this kit, it says at this point you can putty the seams as desired in order to hide the tab-and-slot look of your edges but I decided to go with slightly rounded look instead. Once the yellow glue was completely dry I used a very small flat file to round off the edges, then fine sandpaper for a final smoothing.
Next up was adding to top lattice-like piece that holds your rails in place. This piece has laser-etched slots making rail placement accurate and positive. Once this top piece was in place I applied my color. After looking at photos of old barges, more often than not they tend to have a very dark, grimy look to them. As much as I was tempted to play with some clean white paint lines, in the end I went with the grimy look of a very utilitarian piece of equipment, which is what a car float of the era would likely have been. I did weather the ends and corners of this car float black to give the appearance of a little age and abuse.


I again used my Pliobond contact cement for attaching the rails to the deck, followed up by a quick touch of my soldering iron to set the adhesive solid. Going back a step, prior to attaching the rails I aged these pre-cut sections using Micro Engineering Rail Weathering Solution. The solution gives the rails an almost dusty, dark brown appearance. The last step here was to paint the cleats white and glue them in place at each corner of the car float. A little more weathering powder all around and this kit is done.
I intentionally colored this car float darker than the transfer dock it mates up with to add a little contrast to the scene. I don’t know for sure but it seems to me that a car float or a barge, being on the water all the time, would naturally be a darker color. You can of course color your kit to taste!


In the final photos you can see how well this car float mates up with the transfer dock. As easy as these kits are to build, they actually look more complex and interesting once they’re built-up. Place these two kits in scenic context with a couple of cars on top and you have a real focal point of a layout or diorama!
Category: Raildig Build Projects


