A Quick Diorama
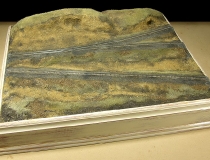
 I don’t know why I always do this, I begin what I think will be a quick little project and before I know it, it’s not! This time out I wanted to build a very simple and fairly generic scene on which I would shoot some photos of the Z-Panzer K5 rail gun for an upcoming article. Since I’d be shooting a WWII era car I also wanted this scene to have a bit of grit to it. Ok, this should be simple as I was going to make it just a bit of scenery on a foam base. Day or two… tops.
I’ve wanted to use a Fast Tracks turnout on a diorama for a while now so let’s add that! Of course I haven’t built any of these turnouts yet so we hit the manuals and videos to learn how. Ok, got the turnout built and in place (it’s a #8 turnout, not your everyday Z turnout and very cool!) and really the rest of the track is just a bit of MTL flex track painted and weathered. A few slight hills and gullies, natural soils ground up… oh, grinding the soils. I collect my own soil for my scenes, bake it and grind it up in a coffee grinder to a good Z scale texture. Of course coffee grinders were meant for coffee, not soil. I go through 3 grinders as the soils eat though the blades very quickly.
Now I really wanted a generic scene here, nothing too over the top as I’d like to use this diorama to photograph other pieces as well in the future. Model Railroader magazine uses generic scenes like this for rolling stock shots, nothing fancy just some track and a bit of ground cover. I’m already getting past the simple stage though… my one or two day tops idea is in the rear view mirror. Next comes various static grass colors and lengths. We’re in good shape. As long as I have this scene starting to look nice, why not put in into a proper base? I have a few of these custom profile oak bases I had made for me some time ago so let’s use one of these.
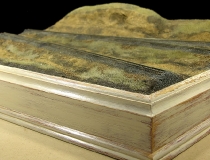
I spent the next couple of days applying and working with lots of faux paint finishes. I could have gone with a straight stain on the oak but lately I like the feel of old, aged (or reclaimed) wood for my pieces. I think it adds a nice contrast to the scene. After using lots of off the shelf faux products I ended up applying a pair of base coats of red milk paint, a pair of top coats of linen milk paint and allowing to fully cure. A series of coarse to fine sanding blocks to remove just enough paint to suggest aged wood. After the sanding process I applied 3 coats of hand rubbed paste wax to give my aged wood a bit of protection. Odd, protecting wood I just tore up a bit to look aged.
Next we needed to place the diorama into the base. I use a polyurethane-based building adhesive for this. The next day the dio was in place but I had gaps all along the edges between the dio and the freshly painted base. Back to the polyurethane adhesive to fill the gaps in and once cured I had to mask off the oak base and add more soil and ballast to these edges. I really like to have the soils meet up exactly with the wood base to give a nice, finished look to the piece.
Finally I have my basic scene… but really at this point I feel is where some of the more interesting scenic elements get added. Covering a few bare spots, some more grasses, some bushes, a bit of scrub here and there. And those hill sections in the rear of the piece, need to do something there as well, maybe some more bushes or short trees. Maybe telephone poles along the tracks, then of course I’ve been wanting to wire up my telephone poles using elastic thread, etc., etc.
No, even a dead-simple little project is never simple but like most things in model railroading, you get out of it what you put in. I can already see myself digging into this nice, simple scene and adding more goodies.
Category: Blog


