Waterfront Project | Turnout Build 2
 In the previous turnout article, we showed the very basics of attaching our turnout stock rails to the ties. In this article, we’ll take a look at our turnout in its near complete form and we’ll also point out a few mistakes we made so you can avoid making them too.
This is less of a comprehensive tutorial and more a few notes of mine. I previously mentioned the Fast Tracks instructional videos as must-watch material and these videos are the reason I feel doing a tutorial is unnecessary, the videos are just that good! I read online where someone had propped their iPad up near their workbench and watched the videos as they built. Play, pause, build, repeat. These videos make it that easy. Below is the first video in the Fast Tracks series, see if you don’t agree.
I’d love to say I didn’t make any mistakes and my first turnout was perfect. While this first turnout is good and I’ve already run trains through it smoothly, I’m treating this turnout as part of my learning curve. I could have gone back and reworked some areas, but I wanted to get one completely built, mistakes and all, to give me a better feel for the process.
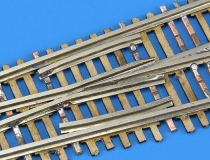
The first images below show the completed turnout skeleton. Really there were just a couple of sections I had some trouble with and I believe after making this first turnout, I can avoid these spots in future builds.
When placing the completed front points in the fixture for final soldering, I found I had the tendency to push them in a bit too far in the fixture. The result is that although the wheels do run smoothly through this section, the point of the frog rails is so far forward that on occasion, wheels can catch on the frog point and send the wheels to the wrong track. This is an easy enough solution on my subsequent turnouts; don’t place the frog point so far forward.
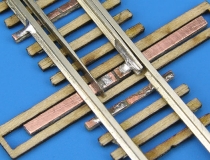
The other area I need to improve on is my switch point rails. The close up photo above shows the switch points. The switch point on the left is just a bit too fine and the one on the right is a bit too blunt. All my wheels did navigate this section smoothly, but I’d like to get these points more uniform in future builds.
Another mistake I made was on the end of the wing rails. You’re supposed to add a slight compound bevel to the end of these to insure trains coming in to the turnouts don’t catch on the square ends of the cut rails. I got a bit turned around and added the bevel to the wrong side of the rails! I won’t make that mistake again.
As this was my test turnout, I didn’t paint or weather anything and you can see several small blobs of solder here and there. Nothing that interferes with the wheels, and I have the sense that after paint and weathering, the occasional solder blob would be unnoticeable.
What I think is both interesting and very encouraging is that even with the mistakes I made during construction, these turnouts are smoother than any commercial turnout I’ve previously run. Running an empty boxcar back and forth is a real joy as it’s incredibly smooth with virtually no unwanted wheel drops or bumps or unwanted friction. This smooth running is so important in Z scale for both appearance and for good operations. Between the smooth running and the prototypical #8 turnout length, these are definitely the turnouts I want for the Waterfront Project layout.
Category: Z Scale Basics


