Real Soil or Ground Foam?
 When building small scenes that will be photographed close-up, I’ve always used real soil as a base layer. I have coffee grinder for milling any real soil I collect down to dust but this can be a bit messy (think clouds of dust when you open the grinder!), and not always convenient or 100% consistent, it’s tough collecting just the right soil color in the middle of winter when the ground is frozen or covered in ice.
The go-to alternative to real soil is commercially available ground foam and turf from companies like Woodland Scenics and Scenic Express. These are great options so I thought I’d play with some of these ground covers for this article.
When working with real soils I always bake my soil in a small oven, then go through it with a strong magnet to remove all metallic particles and finally I sift the soil into different sizes using a series of strainers / sifters. I don’t know why I never thought of this before, but I thought I’d give the synthetic ground foam a pass through the sifters to see how it would hold up. The ground foams are so light, I wasn’t sure if they’d sift properly or just bounce around on the screens.
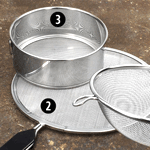
I bought three different kitchen sifters / strainers for this project: a standard, bowl-shaped strainer, a grease splatter screen and finally, a flour sifter. I bought these sifters online so I had to rely on product photos to insure these three screens went from large to small in their mesh size. I also picked up a small white plastic shaker and some stocking material to try to sift at a VERY fine level.
For this test, I used Scenic Express Flock & Turf, Desert Dust Fine. Here are the ground foam sifting results, with a couple of real soil sifting results shown for comparison. Shown here is a Micro-Trains Line N scale boxcar.


- This is the ground foam right out of the shaker bottle, no sifting.
- The ground foam passed through the bowl-shaped strainer. The pieces of foam actually look larger here than they do straight out of the container. This is because the pieces are separated, and more space appears between the individual pieces.
- Now we’re getting somewhere, here’s the ground foam sifted using the flat spatter screen. The particles are definitely looking smaller.
- Here are the results of using the flour sifter. It takes a little longer, but you can see the particles are very small, looking very much like real soil.
- This is the real soil, taken from a single clump (I’m sure there’s a more correct term) of soil that I broke up by hand and passed through the bowl-shaped strainer.
- Finally, here’s the soil passed through the flour sifter.
I haven’t shown the results of the white plastic shaker with the stocking on it as the foam was indeed too light, and it just bounced around the container and gave me VERY few usable foam bits. Perhaps a different stocking material would work better?


As long as I had this sifted material, I thought I’d build a very small little scene using both the synthetic foam and soil and see how they worked together. Overall, there are just these two materials in this scene, just two colors, along with some static grass for contrast. The different sized pieces of the soil and the foam give the appearance of more than just these two colors. In addition, some of the material was soaked with adhesive, some only lighted misted with the adhesive. The more these materials are soaked in glue, the darker they appear.
Conclusion
I didn’t do this sifting test to see if one material was better than the other, I was just curious to see if even the finest ground foam could be made finer, more like real soil. I think from this sift test, the answer is definitely yes.
Category: Useful Tools